
 It’s a simple title because this is going to be the simplest guide to creating the simplest email list you ever saw in your LIFE.
The reason it’s going to be simple is this: before last week, I’d never had to use MailChimp by myself. The thought terrified me. But I rolled up my little sleeves, put a willing smile on my face (OK, lies), and set to work with a determination that others looked on with glowing admiration.
So many lies. The bit that’s not a lie? I’m going to be holding your hand through every step of your way to email elation.
What MailChimp is
‘Tis a monkey that sends mail. If you don’t have a CRM (customer relationship manager), you’re going to need something like MailChimp if you want to send marketing or customer emails.
MailChimp is arguably the most popular DIY email machine on the market and it’s certainly the most user-friendly I’ve seen. You get out of it as much as you put in: if you are a coding genius, you will get delightful and bespoke emails that cause your customers to gasp. If you are not, you will get nice, tidy template emails that do a fine job.
For a small business, MailChimp is a good option in terms of budget because you don’t pay for the platform itself – you pay one credit per email sent. You can buy in small or big batches of credits, so it’s good value for money and you’re not having to blow hundreds of pounds at a time.
[bctt tweet=”A MailChimp email list from start to finish, with no gin at all” username=”yellbusiness”]
If you want to send an email, it stands to reason that you have a bunch of people you’d like to send it to. This list needs to be in a format MailChimp will understand and enjoy.
1. Format your list
Start with an Excel spreadsheet and make two to three columns: one for First Name, one for Second Name (if you really need to call people by both – hopefully not), and one for Email Address.
It doesn’t matter how long or short this list is, only that every cell follows the same format and the columns are labelled correctly. Save the spreadsheet as a CSV file. You just go to Save As and choose CSV from the dropdown of file types.
2. Set up your email list admin
In MailChimp, go to the Lists section in the top menu. Hit the Create List button and then Create List again. It’s very intuitive, promise you.
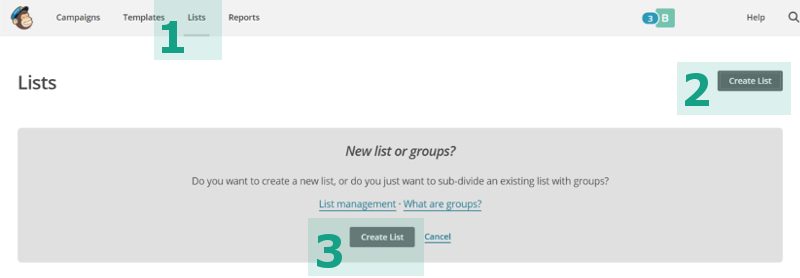
You’ll then fill in a form that deals with the background admin like what email address the receiver sees as the sender of the email – it needs to actually exist because this is who people will reply to if necessary. Every other field of this form has a simple explanation of what you need to do.
At the bottom of the form, there’s some choices for you: how often do you want to get notifications about how your email’s doing? Once you’ve done that, hit save and that’s your admin done.
3. Upload your email list CSV
MailChimp will very rudely tell you that ‘You have no subscribers’ so you’ll have to do something about that. Click Import subscribers, keep the file option as CSV because that’s what you’ve made in Excel, and hit the Next button in the bottom right.
Browse for your CSV file, then hit the Next button again.
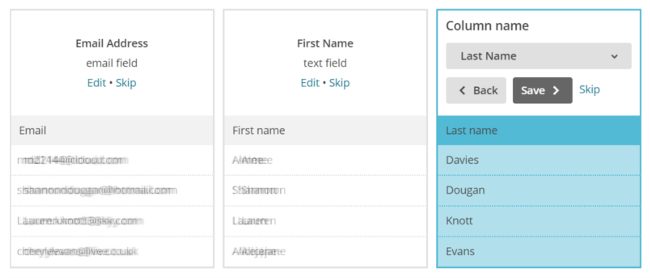
4. Sort your email addresses
Hopefully, if your CSV is set up tidily, you’ll now see all your imported contacts in the columns First Name, [Last Name], Email Address. If so, click Save on each column and hit that Next button one more time.
Otherwise, go back to the CSV and tidy it up. You can rename the columns in MailChimp but, frankly, it’s not worth the risk of people getting their emails addressed to their last names or something else awful.
5. Import ’em
This is just a final check page (you can choose to ‘Categorise the imported contacts as’ but just leave them as Subscribed) so go ahead and hit the Import button.
Done. You have an email list.