More and more small businesses are discovering just how easy it is to create a profile for their company on Facebook – using something referred to as a Facebook page.
In just a few clicks, your business can be found on Facebook – so it’s a job that can be done if you have just a spare hour or two that you can spend in front of the computer.
So here’s exactly how you do it.
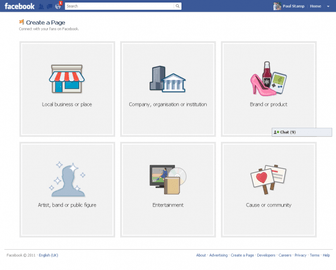
- Visit the area of Facebook for creating pages. This is the first step – here you will find six categories that the different types of Facebook page have been filed under. The one you are after should be ‘Local place or business’. Next, there’s a form to complete – so type in the type of company you are and business details such as your address, postcode and telephone number.
- After this, the wizard gives you the chance to upload a profile page (or, alternatively, import an image from your website). This will sit in the top-left-hand corner of your Facebook page. It needs to be 200px wide ideally – but the depth can be much more, so upright rectangular images work well. To start with, this can be your company logo.
- Next, it’s time to nudge a few of your contacts to get a few likes. The walkthrough guide will prompt you to invite some of your Facebook friends to ‘like’ the page. You can also request likes by importing contacts from outside of Facebook.
- The final step before your page is live on Facebook involves filling in details about your company, along with the always-vital link to your website.
Once this is all taken care of, your page is available to the outside world.
What you are presented with now is the newborn business profile. The left-hand side is home to your page navigation elements, a count of how many likes it has had so far in its lifetime and a count of how many people have commented, liked or shared a post recently.
The middle section is the page wall. This works in a similar way to the wall of a regular personal profile and it’s where your posts will appear as you create them, along with comments and likes from followers (by that I mean people who have liked your page). At the top, underneath your page name, you’ll see space for five images – these will populate as you post images to the wall or upload galleries to the page within the ‘Photos’ section.
The right-hand side is home to various other links, sponsored ads and an example of what an ad for your page could look like, if you are prepared to spend money on Facebook advertising. One of the links down this side is ‘View Insights’ – this is where you can access all of the statistical info around how many people are visiting your page, where they are coming from and the number of people potentially seeing your wall posts.
So essentially what you have is a skeleton page – you can add some flesh to the bones now, but it will only properly fill out over time, as you update the page regularly with fresh content. The things you can begin to fill out now are the Photos section and the Info area – pack this with as much information as possible about who you are, where you are and what you do.
You’re now ready to start posting to the page and engaging with your customers.